My DIY speaker stands

hifimaddy

Well-Known Member
Joined
Sep 14, 2022
Messages
468
Points
63
Location
kerala
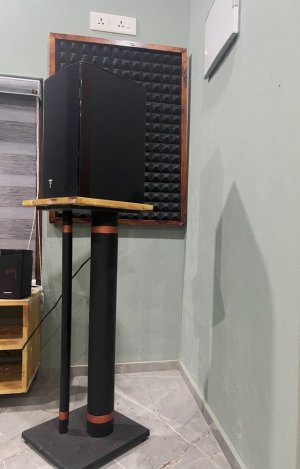
Hey everyone! I have been thinking for many months about sharing pictures and details of my DIY speaker stand. Finally, I uploaded it today. This stand was made by me and my father last year in March, so I have been using it for one year and am very happy. It looks premium and strong from experience. This was very tricky when we made it, and my father helped me do it, and he did the painting job.

Performance and vibration control

I built the stand according to the perfectly maching my ear level from my lisening position. I wanted all long spikes, but due to the height differences, I went for small spikes underneath. I have filled the sand inside and overall improved the sound quality, minimising the impact of vibrations on my speakers by preventing transmission, which results in significantly reduced distortion and coloration. Absolutely; they do the job like branded stands. There are no issues when I play music pretty loud.


(We did it in a cost-effective way and used some materials we already had at home; the rest we brought, and all the tools, including power tools, we already had at home. So if you have some craft skills, anybody can make these pairs.)
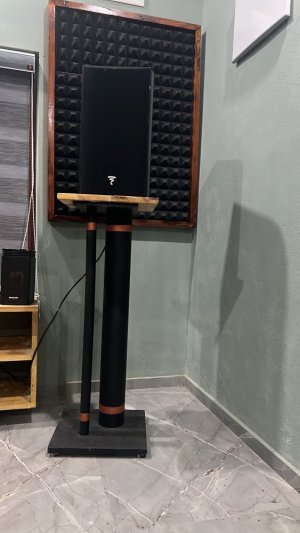
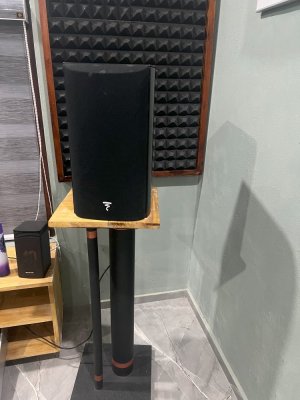
2.jpg1.jpg3.jpg
 
Hey everyone! I have been thinking for many months about sharing pictures and details of my DIY speaker stand. Finally, I uploaded it today. This stand was made by me and my father last year in March, so I have been using it for one year and am very happy. It looks premium and strong from experience. This was very tricky when we made it, and my father helped me do it, and he did the painting job.

Performance and vibration control

I built the stand according to the perfectly maching my ear level from my lisening position. I wanted all long spikes, but due to the height differences, I went for small spikes underneath. I have filled the sand inside and overall improved the sound quality, minimising the impact of vibrations on my speakers by preventing transmission, which results in significantly reduced distortion and coloration. Absolutely; they do the job like branded stands. There are no issues when I play music pretty loud.


(We did it in a cost-effective way and used some materials we already had at home; the rest we brought, and all the tools, including power tools, we already had at home. So if you have some craft skills, anybody can make these pairs.)


View attachment 83460View attachment 83462View attachment 83463
Beautifully done Vishnu ji , looks awesome.


Regards
Aniket Das
 
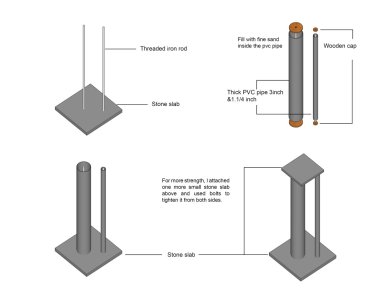
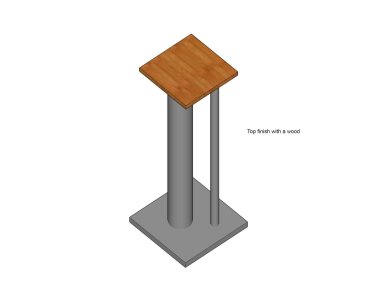
I am updating the diagrams so they will be useful for someone. When you attach the wood, you need to make a hole in the wood where the bolt is. and need some power tools like a grinder, drill, and other tools. In my case, I used automotive paint and airspray, which I have at home. (I used stone slabs because I have some slab pieces leftover, and they are more steady than wooden ones.)


Untitled-1.jpgUntitled-12.jpg
 
Looks great! That orange strip adds a really artistic touch.
I'm almost finished with my DIY speaker stands, should be done by next week.
You mentioned using spikes for your stands. Can you share more details or a picture if you have one?
 
Looks great! That orange strip adds a really artistic touch.
I'm almost finished with my DIY speaker stands, should be done by next week.
You mentioned using spikes for your stands. Can you share more details or a picture if you have one?
I have designed these stands, and I created these 3D diagrams today to upload. It is not downloaded from any websites. and my father is an artist, so he has done those stripes. (it's copper paint), so it looks like a meal pipe in reality. I have planned to go for metal, but in terms of cost and how these came out in the end, it was worth investing the time.

First, I used the normal bush, which we get in all hardware stores. Then later, I replaced it with this spike. It's not exactly for speakers, but to maintain the height, I used these. It has a short spike and is really well matched with the setup.

 
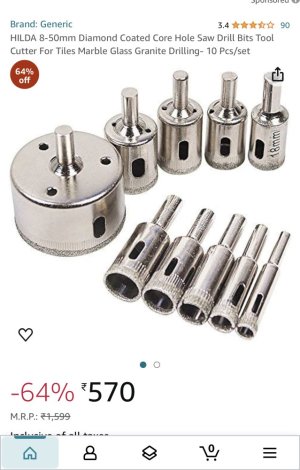
Did you need to drill holes in the stone slabs? If so, how did you manage to do it without breaking the stone? Normally, hole saws are used for drilling, but are there any available with smaller diameters like 8 or 10mm?
 
Did you need to drill holes in the stone slabs? If so, how did you manage to do it without breaking the stone? Normally, hole saws are used for drilling, but are there any available with smaller diameters like 8 or 10mm?
Of course, I use a drill to hole the stone stab to connect the centre rod. I used "diamond drill bit" or "diamond hole." You can search for either of these names on Amazon. I don't remember which set I owned. I was using it a long time ago for another project. You can drill marble, tiles, glass, and stone with this bit. But you need some practice to do it precisely. And also pour water into the drill bit and hole while making holes.After one use in stone, the bit will be useless; it will lose its diamond from the edges. But it was worth it. E10EDCEB-0169-44FA-8394-C01B114A1ED1.jpeg
 
For excellent sound that won't break the bank, the 5 Star Award Winning Wharfedale Diamond 12.1 Bookshelf Speakers is the one to consider!
Back
Top