FlaCharlie
Active Member
This was actually the first circuit I developed with the convenient SMPS used in the Simplissimo, the breadboard style SE EL34 that I posted previously:
While the circuit used here is different, the design follows the same general theme (SMPS, no soldered connections) except that it's more cosmetically appealing since it's built in a chassis.
My granddaughter heard the experimental breadboard version and was impressed with the sound so I suggested that she should build one for herself. Now my experimental breadboards definitely have that mad scientist look - totally chaotic with clip leads running everywhere. So to say that she was highly skeptical would be an understatement. But when I told her it would look nicer and that it could be assembled using a screwdriver, her interest was piqued.
I had originally hoped to have her build the amp when she was 9, during her spring break from 4th Grade. But she had other plans so this has been her summer vacation project. Yes, I helped a bit with the initial prep work. I came up with a layout and drilled the larger holes in the chassis, which is a more difficult job since I don't have a drill press.
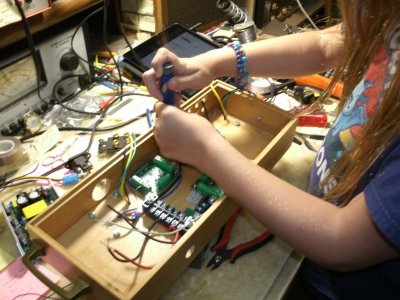
She drilled the smaller holes (her first time using a drill), mounted all the components, tube sockets, terminal blocks, did all the wiring, installed all the resistors and caps, etc. Along the way she learned how to follow a schematic, how to use a multimeter and how to test the tubes on my Hickok tester.
Those who have read my previous build threads know that I like to keep costs low by using repurposed materials and I often use tubes that are "under the radar".
For the chassis we're using the same type of bamboo box that I used for my Boogie Factor 1626 preamp.
These can be found at Target or Walmart. Wood enclosures are easier to work with because more common hand tools can be used. The resultant amp is similar in size to the cult fave Decware - a little smaller, actually.
Here are some pics of the finished amp:
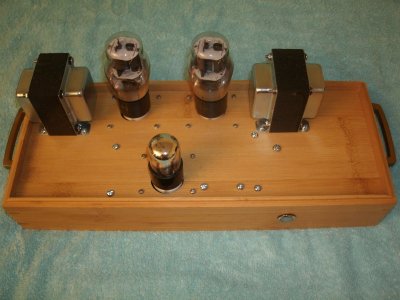
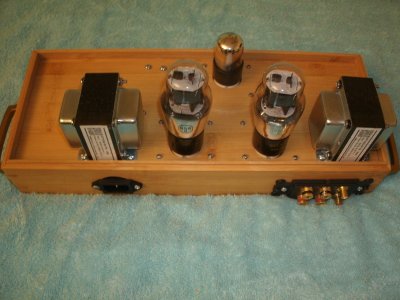
I often use tubes that are "under the radar" so the audio circuit uses one of my favorite oddball output tubes, the 6N6G, paired with the ever popular 6SN7. I've used the 6N6G previously in a SE build, the Nuance iSET:
. . . and in a modded Magnavox PP console amp which originally used 6V6s.
The 6N6G is a dual dissimilar triode with the input triode internally configured as a cathode follower. Check the Nuance iSET thread above for more details.
While it's not currently produced, it's still relatively inexpensive and available. Some dealers may have them and whenever I've looked on eBay I've always found at least 15 or 20 listings for them, some used, some NOS. So obtaining tubes and spares in DIY quantities shouldn't be an issue. Of course, eBay prices vary widely but if you're patient you should be able to find them for ~$20 to 25 and perhaps less.
They're relatively easy to drive so the input circuit can be simple and it's super easy to wire them up. All you need to do is connect the cathode pin directly to ground. No external bias resistor or bypass cap is used. Just put voltage on the plates and you're good to go. According to the data sheets, when the plate of the input section is wired to B+ the output power is comparable to a pentode wired 6V6 but with slightly lower distortion.
The input plate can also be connected directly to the output plate, which is how it's used here. This results in a bit less power output and tightens up the bass. So, I assume there's local feedback being applied. On the Nuance I installed a switch which allows either mode of operation but I've found that I almost never use the higher power mode.
This amp will be used in a small room and my granddaughter doesn't like to listen at loud volumes so the plates of the two sections are connected at the socket. I have no way to measure power output but I would guess that it's ~3 to 3.5 wpc. Based solely on listening impressions I'd say it's somewhat more powerful than a triode wired 6V6.
The output transformers are from Musical Power Supplies in Tennessee. They have a 7k primary, as specified in the 6N6G data sheet for SE operation. These are the "Hi-Fi" versions, not the ones sold for guitar amp use. They're rated at 10w and are considerably more substantial than the little OTs used in the Decware or the popular SE Magnavox amps.
The input tube is the renowned 6SN7. I had several NOS ones and a box of used ones in stock but, surprisingly, I'd never built anything with them before. The one here is a NOS Sylvania GTA and the output tubes are also NOS Sylvanias.
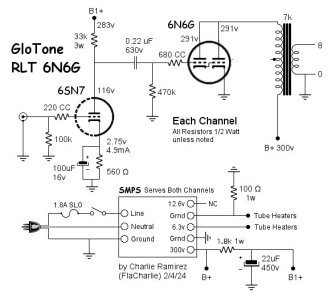
Here's the schematic:
And here are some "in progress" pics . . .
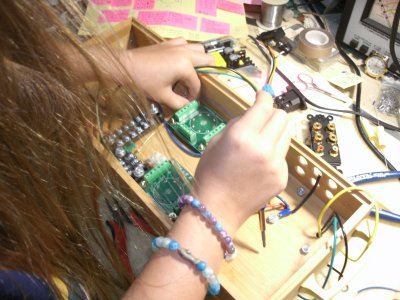
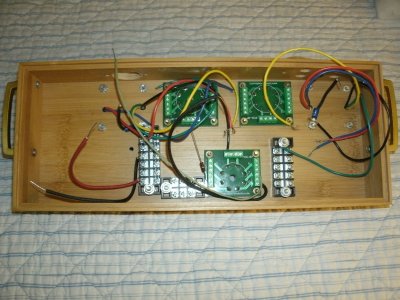
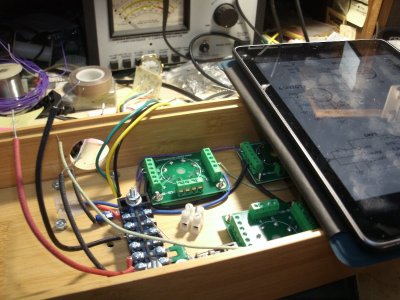
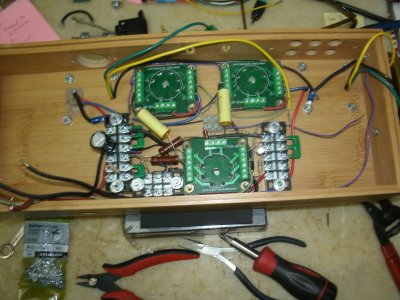
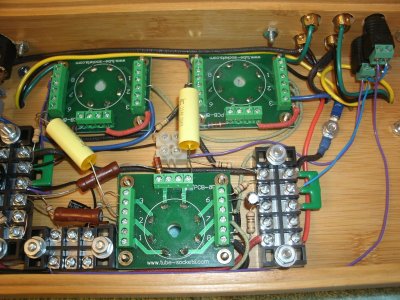
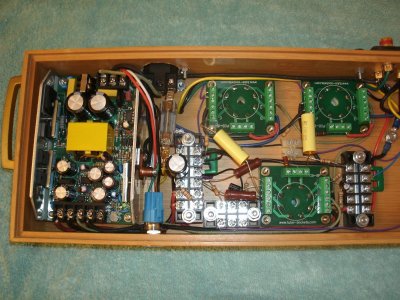
The octal sockets used here are more expensive than the octal relay sockets that I used in the Simplissimo EL34 breadboard amp. These are available in two versions. One for use on a breadboard like the relay types and these, which allow the tubes to be mounted on the top of a chassis while the connectors are accessible underneath. I also have some 9 pin miniature sockets configured like this. There are also 4 pin, 5 pin, 6 pin, 7 pin miniature and loctals in this style but I've only seen those versions configured for breadboard use.
Wall mount speaker binding posts and RCA jacks commonly used in home theater installations, as I used on the Simplissimo EL34 breadboard build, are also used here.
Like most kids these days, my granddaughter only streams music so the amp is designed as a power amp with no volume control. The inputs are connected to either a tiny Bluetooth receiver or an old Apple Airport Express, which uses Wi-Fi, and the volume is controlled by her phone or tablet. If she ever starts using a source with a fixed output level, such as a CD player, there's plenty of room to add a volume control that uses screw connectors. Or I just found an even easier solution - an inexpensive ($25) remote controlled DAC which has coax and optical inputs as well as Bluetooth.
I was going to name the amp after her but she vetoed that idea so I've dubbed it the RLT (Road Less Traveled) 6N6G.
Of course, the first music she played was Taylor Swift.
So a few years ago I picked up a Switch Mode Power Supply (SMPS) that's designed for tube circuits. It has separate outputs for 6.3v and 12.6v heaters and a 300v output for the B+. But other projects took precedence so it sat on the shelf for a long time. Some folks over at DIYAudio had messed around with them with varying results. I culled as much info as I could from them and I finally got around to using it on my breadboard setup to power a basic SE circuit. The obvious attractions are low cost and simplicity.
This piqued my interest in extending that element of simplicity to the...
This piqued my interest in extending that element of simplicity to the...
- FlaCharlie
- Replies: 10
- Forum: DIY
While the circuit used here is different, the design follows the same general theme (SMPS, no soldered connections) except that it's more cosmetically appealing since it's built in a chassis.
My granddaughter heard the experimental breadboard version and was impressed with the sound so I suggested that she should build one for herself. Now my experimental breadboards definitely have that mad scientist look - totally chaotic with clip leads running everywhere. So to say that she was highly skeptical would be an understatement. But when I told her it would look nicer and that it could be assembled using a screwdriver, her interest was piqued.
I had originally hoped to have her build the amp when she was 9, during her spring break from 4th Grade. But she had other plans so this has been her summer vacation project. Yes, I helped a bit with the initial prep work. I came up with a layout and drilled the larger holes in the chassis, which is a more difficult job since I don't have a drill press.
She drilled the smaller holes (her first time using a drill), mounted all the components, tube sockets, terminal blocks, did all the wiring, installed all the resistors and caps, etc. Along the way she learned how to follow a schematic, how to use a multimeter and how to test the tubes on my Hickok tester.
Those who have read my previous build threads know that I like to keep costs low by using repurposed materials and I often use tubes that are "under the radar".
For the chassis we're using the same type of bamboo box that I used for my Boogie Factor 1626 preamp.
I mentioned this preamp in the thread about Class D amps and a couple of people seemed interested so this thread will offer some details. What I'll do here is to present an updated version of a thread I posted elsewhere in 2020, when I built this.
Some background: I first got interested in tube gear about 20 years ago and started buying vintage tube amps. I soon realized that I would need to learn how to restore / repair them myself because qualified techs were hard to find and paying them would be too expensive. So I collected a lot of vintage tube amps, learned to repair them and...
Some background: I first got interested in tube gear about 20 years ago and started buying vintage tube amps. I soon realized that I would need to learn how to restore / repair them myself because qualified techs were hard to find and paying them would be too expensive. So I collected a lot of vintage tube amps, learned to repair them and...
- FlaCharlie
- Replies: 1
- Forum: DIY
These can be found at Target or Walmart. Wood enclosures are easier to work with because more common hand tools can be used. The resultant amp is similar in size to the cult fave Decware - a little smaller, actually.
Here are some pics of the finished amp:


I often use tubes that are "under the radar" so the audio circuit uses one of my favorite oddball output tubes, the 6N6G, paired with the ever popular 6SN7. I've used the 6N6G previously in a SE build, the Nuance iSET:
Thought I'd post a thread about the "inverted" SET ( iSET ) amp that I mentioned in my earlier thread about my Boogie Factor 1626 preamp.
 www.hifivision.com
Most of the discussion about Single Ended Triode amps (and tube amps in general) seems to center on the type of output tube that's being used. Traditionally, the output tubes used in SETs are all directly heated. Many consider direct heating to be the most important ingredient in the whole "SET magic" recipe.
The most commonly used are the 45, 2A3 and 300B...
Glo-Tone Boogie Factor 1626 Tube Preamp
I mentioned this preamp in the thread about Class D amps and a couple of people seemed interested so this thread will offer some details. What I'll do here is to present an updated version of a thread I posted elsewhere in 2020, when I built this. Some background: I first got interested in...
Most of the discussion about Single Ended Triode amps (and tube amps in general) seems to center on the type of output tube that's being used. Traditionally, the output tubes used in SETs are all directly heated. Many consider direct heating to be the most important ingredient in the whole "SET magic" recipe.
The most commonly used are the 45, 2A3 and 300B...
- FlaCharlie
- Replies: 6
- Forum: DIY
. . . and in a modded Magnavox PP console amp which originally used 6V6s.
The 6N6G is a dual dissimilar triode with the input triode internally configured as a cathode follower. Check the Nuance iSET thread above for more details.
While it's not currently produced, it's still relatively inexpensive and available. Some dealers may have them and whenever I've looked on eBay I've always found at least 15 or 20 listings for them, some used, some NOS. So obtaining tubes and spares in DIY quantities shouldn't be an issue. Of course, eBay prices vary widely but if you're patient you should be able to find them for ~$20 to 25 and perhaps less.
They're relatively easy to drive so the input circuit can be simple and it's super easy to wire them up. All you need to do is connect the cathode pin directly to ground. No external bias resistor or bypass cap is used. Just put voltage on the plates and you're good to go. According to the data sheets, when the plate of the input section is wired to B+ the output power is comparable to a pentode wired 6V6 but with slightly lower distortion.
The input plate can also be connected directly to the output plate, which is how it's used here. This results in a bit less power output and tightens up the bass. So, I assume there's local feedback being applied. On the Nuance I installed a switch which allows either mode of operation but I've found that I almost never use the higher power mode.
This amp will be used in a small room and my granddaughter doesn't like to listen at loud volumes so the plates of the two sections are connected at the socket. I have no way to measure power output but I would guess that it's ~3 to 3.5 wpc. Based solely on listening impressions I'd say it's somewhat more powerful than a triode wired 6V6.
The output transformers are from Musical Power Supplies in Tennessee. They have a 7k primary, as specified in the 6N6G data sheet for SE operation. These are the "Hi-Fi" versions, not the ones sold for guitar amp use. They're rated at 10w and are considerably more substantial than the little OTs used in the Decware or the popular SE Magnavox amps.
The input tube is the renowned 6SN7. I had several NOS ones and a box of used ones in stock but, surprisingly, I'd never built anything with them before. The one here is a NOS Sylvania GTA and the output tubes are also NOS Sylvanias.
Here's the schematic:

And here are some "in progress" pics . . .


The octal sockets used here are more expensive than the octal relay sockets that I used in the Simplissimo EL34 breadboard amp. These are available in two versions. One for use on a breadboard like the relay types and these, which allow the tubes to be mounted on the top of a chassis while the connectors are accessible underneath. I also have some 9 pin miniature sockets configured like this. There are also 4 pin, 5 pin, 6 pin, 7 pin miniature and loctals in this style but I've only seen those versions configured for breadboard use.
Wall mount speaker binding posts and RCA jacks commonly used in home theater installations, as I used on the Simplissimo EL34 breadboard build, are also used here.
Like most kids these days, my granddaughter only streams music so the amp is designed as a power amp with no volume control. The inputs are connected to either a tiny Bluetooth receiver or an old Apple Airport Express, which uses Wi-Fi, and the volume is controlled by her phone or tablet. If she ever starts using a source with a fixed output level, such as a CD player, there's plenty of room to add a volume control that uses screw connectors. Or I just found an even easier solution - an inexpensive ($25) remote controlled DAC which has coax and optical inputs as well as Bluetooth.
I was going to name the amp after her but she vetoed that idea so I've dubbed it the RLT (Road Less Traveled) 6N6G.
Of course, the first music she played was Taylor Swift.
Last edited:

