
This is just a project to demonstrate fun thing that you can do with a cheap 20x4 or 16x2 LCD displays which use the Hitachi HD44780 controller. The Hitachi HD44780 LCD controller is an alphanumeric dot matrix liquid crystal display (LCD) controller developed by Hitachi in the 1980s. The character set of the controller includes ASCII characters, Japanese Kana characters, and some symbols in two 40 character lines. Using an extension driver, the device can display up to 80 characters. Numerous third-party displays are compatible with its 16-pin interface and instruction set, making it a popular and cheap LCD driver. This display with the controller costs less than Rs 300 on amazon. Just search for 20x4 lcd on amazon dot in and you will get many listings.
In this tutorial I'm going to detail both the software and hardware installation along with the wiring details on how to connect the lcd to your raspberry Pi. The software involves installing my LCD daemon which I just finished writing today and I have released it as open source on github. LCD Daemon interfaces with the LCD display and accepts text to be displayd on the display from any host on the network. If you have a streamer like moode, volumio, your own you can display the song, album. artist, etc get displayed on the LCD display without physically connecting this lcd display to your streamer. The LCD display accepts either a UDP packet from anywhere to port 1806 or one can use the shell command to simply echo the message to a named pipe. The text can be sent from any machine regardless of the OS. As long as you can send a UDP packet to port 1806 to any IP address, the message will get displayed. In the example below my macbook is sending the song being played to the LCD display. The LCD display is highly configurable. You can tell it which pin of the raspberry PI is connected to which pin on the LCD display and it will configure itself accordingly. But for the purpose of this demo, I'm going to wire it as per my convenience.
This LCD has 8 data pins. One can use them in 8 bit mode where all the 8 pins are used for data or 4 bit mode where we use only 4 of the 8 pins. I will be demonstrating how to use just 4 pins of the raspberry pi so that rest of the pins can be used for example connecting a sound card, etc.
What you need
1) RPI with OS installed
2) Jumper wires like this. You actually just need 16 jumper wires
3) One potentiometer 10 k for contrast control
4) 20x4 lcd display
5) Female berg strip like this. You will have to break the berg strip so that you have 16 terminals. Then insert the berg strip with 16 terminals into the LCD display and solder them. This is a photo of the LCD display with the berg strip soldered on the back side. You can solder it on the front instead also.

Wiring
Raspberry PI has the GPIO header and the LCD has 16 pins. Both are shown below. First is the RPI GPIO header pinout and below that is the pinout for the LCD display
1. Raspberry PI GPIO Header pinout

2. 20x4 LCD pinout

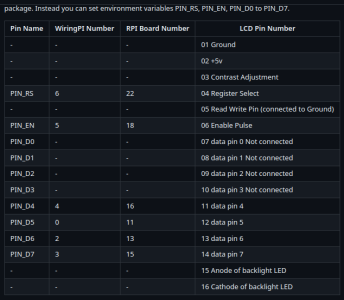
Now Let us wire the LCD display to Raspberry PI. You will need jumper wires. The table below ilustrates which wire on the RPI to connect to which pin. e.g.
Connect pin 1 on the lcd to pin 6 on RPI - This is the ground
Connect pin 2 on the LCD to pin 2 on RPI - This is +5v
Conect a potentiometer with the outer pins to Ground and +5 v. Connect the middle pin of the potentiometer to pin 03 of the LCD display
Connect pin 4 to pin 22 on the RPI
Connect pin 5 to the ground
Connect pin 6 to pin 18 on the RPI
Connect pin 11 to pin 16 on the RPI
Connect pin 12 to pin 11 on the RPI
Connect pin 13 to pin 13 on the RPI
Connect pin 14 to pin 15 on the RPI
Connect pin 15 to pin 2 on the RPI - This is +5v
Connect pin 16 to pin 9 on the RPI - This is the ground
Table: Wiring Details for connecting LCD display to RPI

Software
These are the URLS for the sotware and the binary debian package. You just need to install my lcd daemon and that will pull the libwiring pi dependency.
Installtion is very simple. You just need to follow the following instructions by execting the below 4 commands. The First two commands installs the open build service repository from openSUSE. Open Build Service is a free service that allows developers to build RPM, Debian and archlinux packages for free and host the binary packages.
After installation you should see the text "Display Initialized" on the LCD display. Now you can print any text on this display like this. Here are few examples
Display text locally on the first row
You can also use the echo command. The below command prints Hi from local on the lcd display
Let us say the IP address of this RPI is 192.168.1.100. Then you can send messages to be printed from any host on the network like this
If you install my mpdev package on your streamer it will display the song information being played remotely on the raspberry pi having the LCD display like shown in the below picture. mpdev can be installed by the following (provided you have enabled my open build service repository)
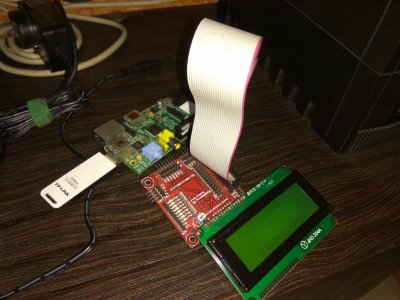
This is my second version minus the jumper wires. I used a ready-made board that can be connected the the RPI via a ribbon cable

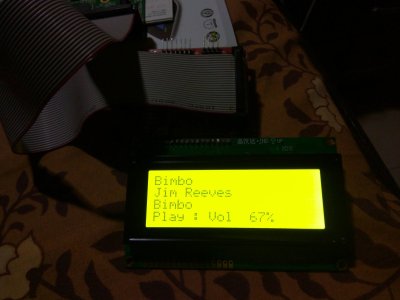
This is the raspberry pi display text that was sent to it from a remote streamer (my macbook) playing Jim Reeves Bimbo Bombo

This is the my macbook playing Bimbo Bimbo by Jim Reeves and the song information is being displayed remotely on the Raspberry PI which has the LCD display connected

In this tutorial I'm going to detail both the software and hardware installation along with the wiring details on how to connect the lcd to your raspberry Pi. The software involves installing my LCD daemon which I just finished writing today and I have released it as open source on github. LCD Daemon interfaces with the LCD display and accepts text to be displayd on the display from any host on the network. If you have a streamer like moode, volumio, your own you can display the song, album. artist, etc get displayed on the LCD display without physically connecting this lcd display to your streamer. The LCD display accepts either a UDP packet from anywhere to port 1806 or one can use the shell command to simply echo the message to a named pipe. The text can be sent from any machine regardless of the OS. As long as you can send a UDP packet to port 1806 to any IP address, the message will get displayed. In the example below my macbook is sending the song being played to the LCD display. The LCD display is highly configurable. You can tell it which pin of the raspberry PI is connected to which pin on the LCD display and it will configure itself accordingly. But for the purpose of this demo, I'm going to wire it as per my convenience.
This LCD has 8 data pins. One can use them in 8 bit mode where all the 8 pins are used for data or 4 bit mode where we use only 4 of the 8 pins. I will be demonstrating how to use just 4 pins of the raspberry pi so that rest of the pins can be used for example connecting a sound card, etc.
What you need
1) RPI with OS installed
2) Jumper wires like this. You actually just need 16 jumper wires
3) One potentiometer 10 k for contrast control
4) 20x4 lcd display
5) Female berg strip like this. You will have to break the berg strip so that you have 16 terminals. Then insert the berg strip with 16 terminals into the LCD display and solder them. This is a photo of the LCD display with the berg strip soldered on the back side. You can solder it on the front instead also.
Wiring
Raspberry PI has the GPIO header and the LCD has 16 pins. Both are shown below. First is the RPI GPIO header pinout and below that is the pinout for the LCD display
1. Raspberry PI GPIO Header pinout
2. 20x4 LCD pinout
Now Let us wire the LCD display to Raspberry PI. You will need jumper wires. The table below ilustrates which wire on the RPI to connect to which pin. e.g.
Connect pin 1 on the lcd to pin 6 on RPI - This is the ground
Connect pin 2 on the LCD to pin 2 on RPI - This is +5v
Conect a potentiometer with the outer pins to Ground and +5 v. Connect the middle pin of the potentiometer to pin 03 of the LCD display
Connect pin 4 to pin 22 on the RPI
Connect pin 5 to the ground
Connect pin 6 to pin 18 on the RPI
Connect pin 11 to pin 16 on the RPI
Connect pin 12 to pin 11 on the RPI
Connect pin 13 to pin 13 on the RPI
Connect pin 14 to pin 15 on the RPI
Connect pin 15 to pin 2 on the RPI - This is +5v
Connect pin 16 to pin 9 on the RPI - This is the ground
Table: Wiring Details for connecting LCD display to RPI
Software
These are the URLS for the sotware and the binary debian package. You just need to install my lcd daemon and that will pull the libwiring pi dependency.
- The wiringPi library. Controlling this lcd requires wiring pi library which was written by Gordon Henderson. This is a very popular library and the library became the foundation for other languages in python, php, ruby, perl and node.js - https://github.com/WiringPi/WiringPi
- The lcd daemon. This has been written by me. It needs to be installed on the raspberry pi which has the LCD display connected. This accepts messages to be written to the display locally using the pilcd command or from the network on UDP port 1806. - https://github.com/mbhangui/lcd-daemon
- The open Build Service repo at https://build.opensuse.org/package/show/home:mbhangui:raspi/lcd-daemon
Installtion is very simple. You just need to follow the following instructions by execting the below 4 commands. The First two commands installs the open build service repository from openSUSE. Open Build Service is a free service that allows developers to build RPM, Debian and archlinux packages for free and host the binary packages.
echo 'deb http://download.opensuse.org/repositories/home:/mbhangui:/raspi/Raspbian_11/ /' | sudo tee /etc/apt/sources.list.d/home:mbhangui:raspi.list
curl -fsSL https://download.opensuse.org/repositories/home:mbhangui:raspi/Raspbian_11/Release.key | gpg --dearmor | sudo tee /etc/apt/trusted.gpg.d/home_mbhangui_raspi.gpg > /dev/null
sudo apt update
sudo apt install lcd-daemon
After installation you should see the text "Display Initialized" on the LCD display. Now you can print any text on this display like this. Here are few examples
Display text locally on the first row
Display text locally on the second rowpilcd -r 0 How are you
Display text locally on the third rowpilcd -r 1 how are you
Scroll text on the fourth rowpilcd -r 2 how are you
pilcd -s -r 2 Displaying text on this LCD is fun
You can also use the echo command. The below command prints Hi from local on the lcd display
echo 1 0 0:Hi from local > /run/lcd-daemon/lcdfifo
Let us say the IP address of this RPI is 192.168.1.100. Then you can send messages to be printed from any host on the network like this
echo 1 0 0:Hi from local > /run/lcd-daemon/lcdfifo
If you install my mpdev package on your streamer it will display the song information being played remotely on the raspberry pi having the LCD display like shown in the below picture. mpdev can be installed by the following (provided you have enabled my open build service repository)
apt-get install mpdev
This is my second version minus the jumper wires. I used a ready-made board that can be connected the the RPI via a ribbon cable
This is the raspberry pi display text that was sent to it from a remote streamer (my macbook) playing Jim Reeves Bimbo Bombo
This is the my macbook playing Bimbo Bimbo by Jim Reeves and the song information is being displayed remotely on the Raspberry PI which has the LCD display connected
Attachments
Last edited: