You are using an out of date browser. It may not display this or other websites correctly.
You should upgrade or use an alternative browser.
You should upgrade or use an alternative browser.
DIY Sealed Subwoofer
- Thread starter aeroash
- Start date
Interesting. Wasn't aware of such a product. Effective?
keith_correa
Well-Known Member
We'll find out after you implement it in your build.Effective?
It'll be difficult to know if it's effective in a speaker enclosure unless you're suggesting just this with no stuffing.We'll find out after you implement it in your build.
Its effectiveness could be better understood if used on the body of the car. Have a car?
keith_correa
Well-Known Member
Can the wall be painted with this
Vineethkumar01
Well-Known Member
Not only aesthetic. With bigger structures like the plastic plate that holds the binding posts larger holes need to be cut in the cabinet to attach them. This may cause potential air leaks depending upon how it all fits together. Also there is a potential for unwanted resonances. This being a sealed subwoofer, we want to avoid that as much as possible.Is this from an aesthetic point of view?
Sure. In that case, it is ok.I have all material at hand and executing this build myself, hence no labour costs.
At first sight, your crown amp looks fine for the purpose. Let's see how good it is first.My Crown XLS can be used for testing purposes, but I'll have to procure an additional amp for Sub duties.
Sure. We can experiment and see what is best.This will depend on what REW shows me.
This is nice.. So that part is taken care ofSabaj A30a. It has a subwoofer out, as well as a crossover.
Sure. usually when the subs are used crossed over around 100Hz or so, with closer placement to speakers and the room cooperating, one may not need delay adjustments but it needs to be experimented and seen what is the best strategy in this scenario. Since you have a dsp processor for experimentation, it is fine.I have a miniDSP Flex, again, this can be used for testing purposes only. I have to return it to my main system. Depending on the location, if a delay is necessary then I'll have to think about managing the same.
This is almost all you will need to measure and fine tune this subwoofer..Yes. Flex with UMIK 1.
Thank you.Thanks, I value your effort, guidance, and generosity, much appreciated.
@Vineethkumar01 These are the final dimensions. I reduced the height, in case I need to pass the sub under the TV. I have compensated for the height and width reduction by going deeper. This reduction also means that there is now a minimum surface area around the speaker on the baffle, and hence a double baffle is not required. 18mm bracing will also support the baffle.
It's possible that this might be slightly larger than 105L, let me know what you think.
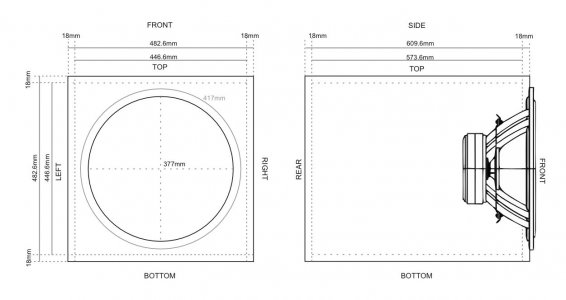
It's possible that this might be slightly larger than 105L, let me know what you think.

Last edited by a moderator:
Vineethkumar01
Well-Known Member
Cabinet internal volume-wise, it looks fine. You will have similar response as we had modeled earlier. About 113L external volume. Keeping apart 5L for driver, 6L for bracing, we get to around 100L of internal volume. This looks fine bass alignment-wise and box resonance mode-wise (still the first mode will be around 250-300Hz area as before).@Vineethkumar01 These are the final dimensions. I reduced the height, in case I need to pass the sub under the TV. I have compensated for the height and width reduction by going deeper. This reduction also means that there is now a minimum surface area around the speaker on the baffle, and hence a double baffle is not required. 18mm bracing will also support the baffle.
It's possible that this might be slightly larger than 105L, let me know what you think.
View attachment 71947
I don't know whether skipping the double baffle is a good idea or not. I get that smaller panel may be stiffer but this is a 15inch driver that weighs more than 10kg. It will need some mass and material on the baffle to hold on to. I have used even a 9.5 inch driver in a 36mm thick baffle.
But accurate prediction of how skipping thr double baffle will turn out w. r. t forces acting on the baffle and the cabinet will need detailed BEM simulations which i dont have access to at the moment. So if you are absolutely convinced that only an 18mm thick baffle is needed you can go ahead with it. But otherwise, I would be more comfortable with a double baffle.
Understood. I'll take a call before I commence bracing.So if you are absolutely convinced that only an 18mm thick baffle is needed you can go ahead with it. But otherwise, I would be more comfortable with a double baffle.
Dust inhalation is in progress.
@Vineethkumar01 I have decided to go for a 36mm baffle.
What can I use for stuffing? I have the Rockwool SIlent Pro 350 (Density 60kg/m³) in 50mm Thickness.
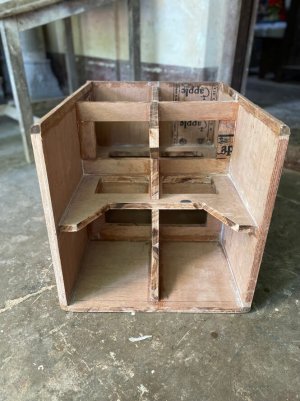
I'll try out the TufKote, and measure the response. I'll perhaps not need any stuffing
Last edited by a moderator:
Vineethkumar01
Well-Known Member
@aeroash: you are really going at a fast pace.. 
With a sealed box, we want to mainly ensure 3 things:
1) Minimise leakages in the box: Carefully inspect and ensure that all joints are proper and use glue/appropriate other material to seal the gaps if any.
2) Eliminate/minimize unwanted resonances in the passband of the speaker/sub: Ensure that there are no rattling structures inside the box and air flow inside the box can be relatively smooth. Box resonance modes which arise due to the dimensions of the enclosure, we have sort of taken care of in the design stage itself. Because the kind of frequencies that we are looking at in a subwoofer like this is very low, significant amount of appropriate damping material will be needed to eliminate any low frequency resonances depending on their magnitude if they arise. So if we find out anything like that on measuring, we can even go for Rockwool type of material.
3) Bass alignment tuning: This is where most of the effect of stuffing material is. Materials like polyfill, fibreglass, sheep's wool when loosely leased out and stuffed in the enclosure helps with apparant increase in internal volume that the driver sees. However this is a lossy and sort of non linear process and we sacrifice some amount of efficiency to achieve the desired bass alignment (to some extent).
As you remarked, it is not necessary to stuff the box always. But in my simulations, I have assumed some amount of stuffing. It will make only minor differences anyway. So let's measure and see if stuffing is needed and if needed, by how much amount.
Thanks
Vineeth
PS: I have no experience with tuffkoate, so i really don't know what it does. But if it helps with soundproofing/leakage prevention, then why not..
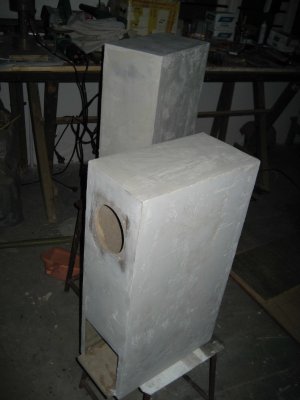
I have rerun the seams and they're well sealed. I want to make the box as airtight and inert as possible.1) Minimise leakages in the box: Carefully inspect and ensure that all joints are proper and use glue/appropriate other material to seal the gaps if any.
I bought a recessed binding post because I didn't want anything sticking beyond the box. I bought this because it said "full metal body". It arrived today and it's plastic. I'll just get the Dayton Audio you recommended, they look solid.
Full brakes on the project as I wait for TuffKote and the new binding posts.
Also juggling a few options for the outer finish on the box. I have something in mind.
Alternative.
Metal Paste. about 100-200 per kg(with hardener).
where short shelf life once mixed ( 10-15 minutes)
Metal paste? It'll be quite a task to apply it on the whole of the insides, especially with the bracing on.Alternative.
Metal Paste. about 100-200 per kg(with hardener).
where short shelf life once mixed ( 10-15 minutes)
TuffKote is to be applied like paint. Either by brush or spray.
Agree.Metal paste? It'll be quite a task to apply it on the whole of the insides, especially with the bracing on.
TuffKote is to be applied like paint. Either by brush or spray.
I'd used it on outside - about 3mm thickness on sides - as this was a larger surface area. - this was some 10 years back (Fostex FE126NV) build.
revolty
Active Member
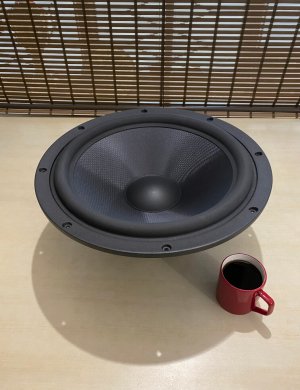
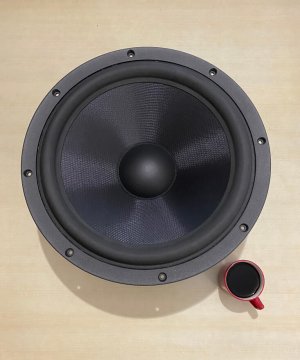
Hi,The thing that goes BOOM is here.
Coffee cup for comparison. One of them makes you go boom from the rear.
View attachment 72070
Looks like the Q Acoustics logo?
View attachment 72071
Congrats.
Is this SB Acoustics driver? From where did you purchase this and for how much?
Hi,
Congrats.
Is this SB Acoustics driver? From where did you purchase this and for how much?
SB Acoustics SB42FHCL75-6 15" Honey Comb Woofer
From diyaudiocart.comTuf-Kote done. Waiting on binding posts and a soldering iron. It's been more than 25 years since I handled a soldering iron. The last time I touched it, it scalded my finger; bloody iron! A fitting response was mated by dunking the iron in ice-cold water. Die Iron Die!
Last edited by a moderator:
Vineethkumar01
Well-Known Member
Looks really nice.. 
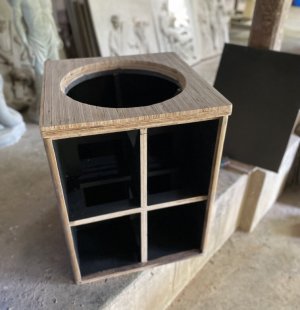
What is the material used for baffle.
Also what are we planning so as to not let the subwoofer move around during use..
What is the material used for baffle.
Also what are we planning so as to not let the subwoofer move around during use..
Thanks, Vineeth!Looks really nice..
It's the cross-section of the plywood. I cut about 20 pieces of 10mm width, and then stuck them together on the baffle. The baffle is now 46mm. But, the extra thickness is on the outside, so it's fine.What is the material used for baffle.
I plan to plonk it on a 10mm gym tile. Let's see how it goes. Or I can make 20mm high feet out of it.Also what are we planning so as to not let the subwoofer move around during use..
Join WhatsApp Channel to get HiFiMART.com Offers & Deals delivered to your smartphone!
Similar threads
- Replies
- 3
- Views
- 5K
- Replies
- 32
- Views
- 4K


